The Room-Level Management Dashboard allows you to access reports, analyse data, and manage various other aspects relating to a Single Room.
¶ Accessing the Room Dashboard
Room-Level Management can be accessed from the Organisation Level Dashboard and expanding Sites and Units until you can see the relevant Units Rooms.

Simply click on the Room that you want to view the details of, and you will be taken to it's Management View.
¶ Main Dashboard and Interface Overview
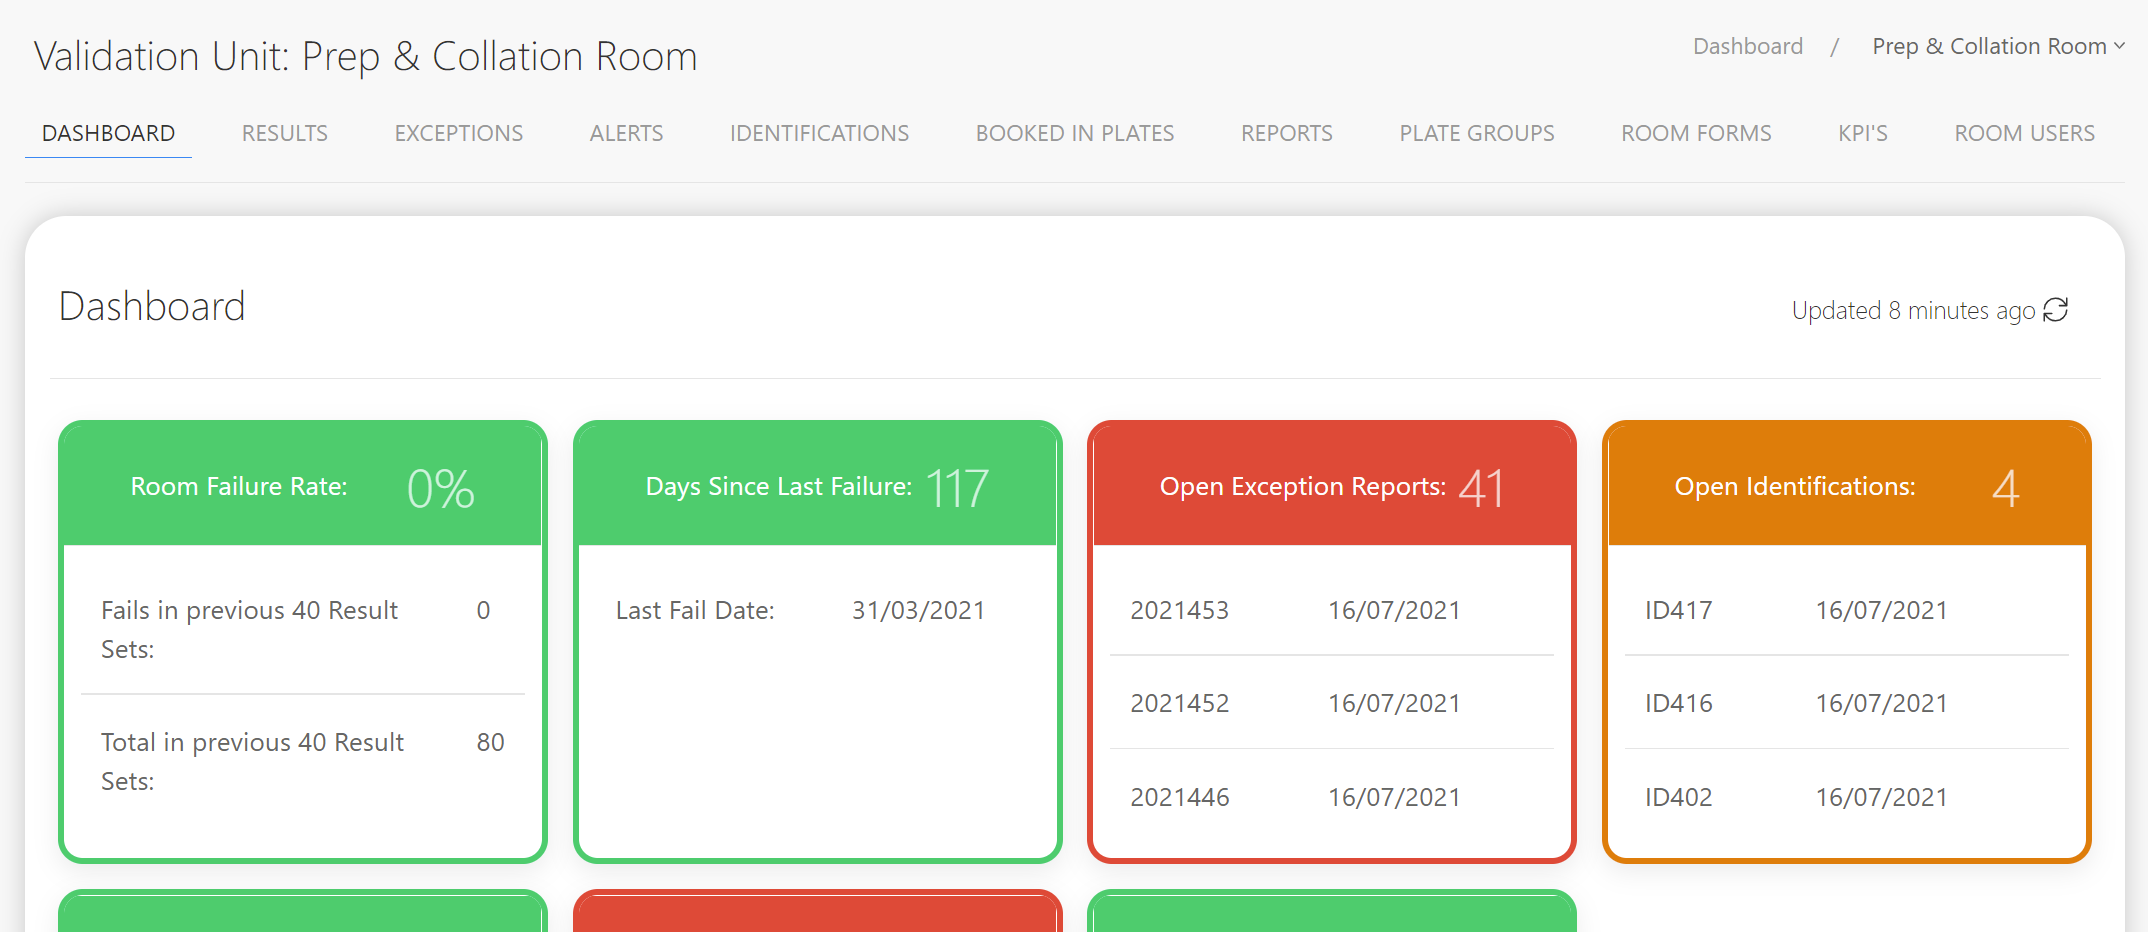
The default Dashboard entry will give you an overview of a Room's performance, and show any Open Exception/Identification Reports that need actioning.
Various other sections can be accessed via the Navigation Tabs at the top of the page:
- Results
View the history of Result Sets for this Room. - Exceptions
View all Exception Reports relating to this Room (both current and historic) - Alerts
View all Alert Reports relating to this Room (both current and historic) - Identifications
View all Identifications relating to this Room. - Booked-In Plates
View Plates that have been Booked-In with the lab, but have not yet been read. - Reports
View and Generate various Reports related to this Room's performance. - Plate Groups
Add/Remove Plate Groups which can then be used to further customise Reports. - Room Forms
Download the Instance Room Forms to be sent with the Booked-In Plates - KPI's
View this Rooms Key Performance Indicator based on a custom date-range. - Room Users
Manage the MRS Web Users who have access to this Rooms data.
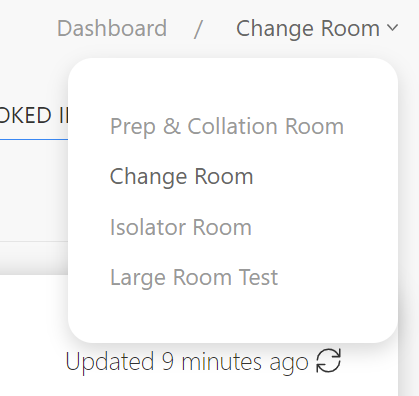
You can easily access another Room within the same Unit as the currently selected Room by clicking on the Room selection dropdown in the top-right hand corner of the Dashboard:
¶ View Result Sets From a Room
From the Room Dashboard, select the Results tab from the top menu, which will display a list of the Rooms entire history of Result Sets.

Result Sets are listed in order of most recent, and any associated Exception Reports for a particular Result Set will be highlighted in Red, and the number of Exceptions generated by this Result Set will be displayed.
To display the full details of a Result Set, simply click on its entry in the list, and you will be able to view it in its entirety:
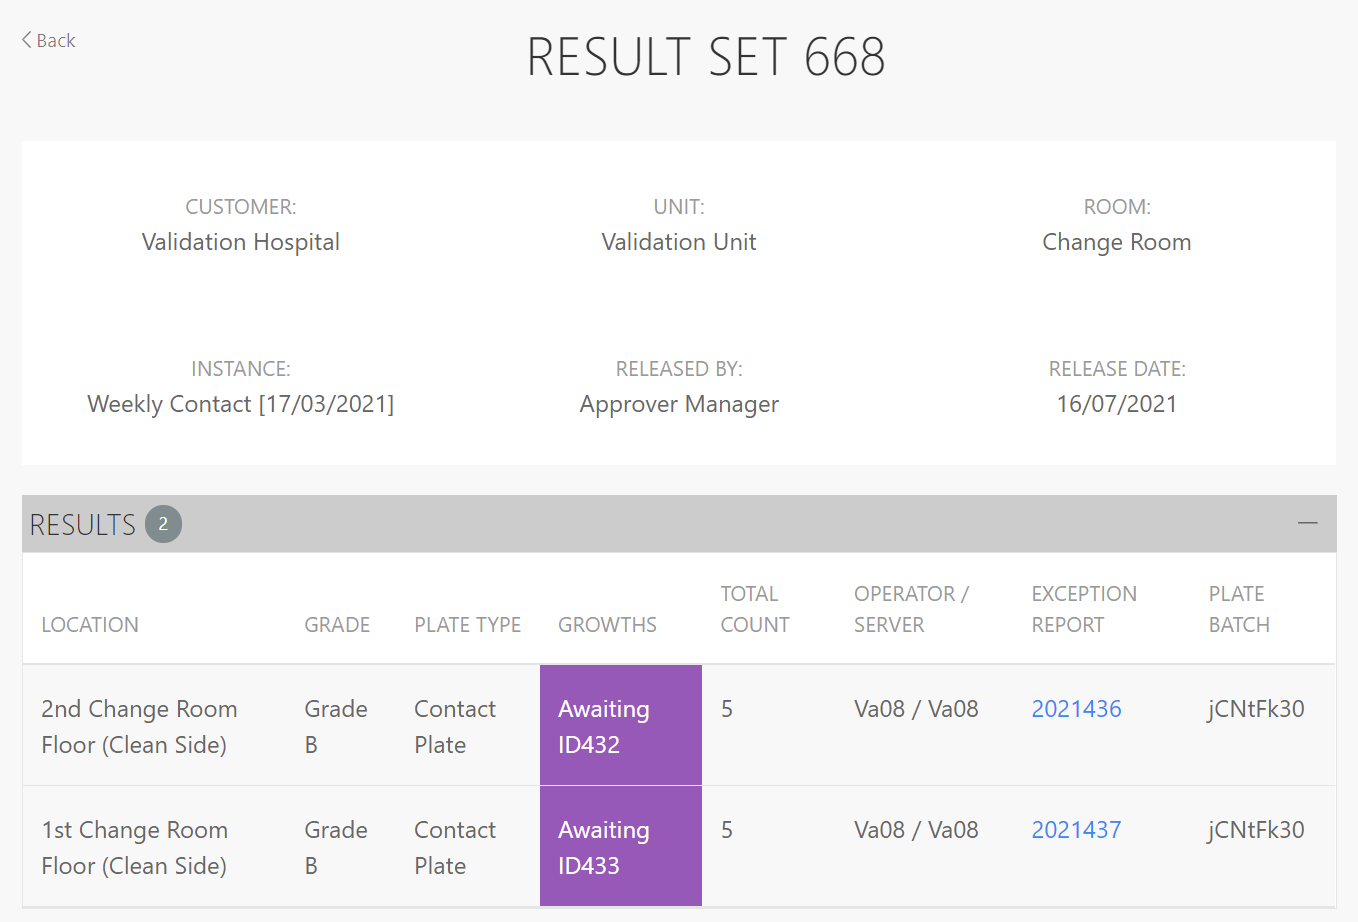
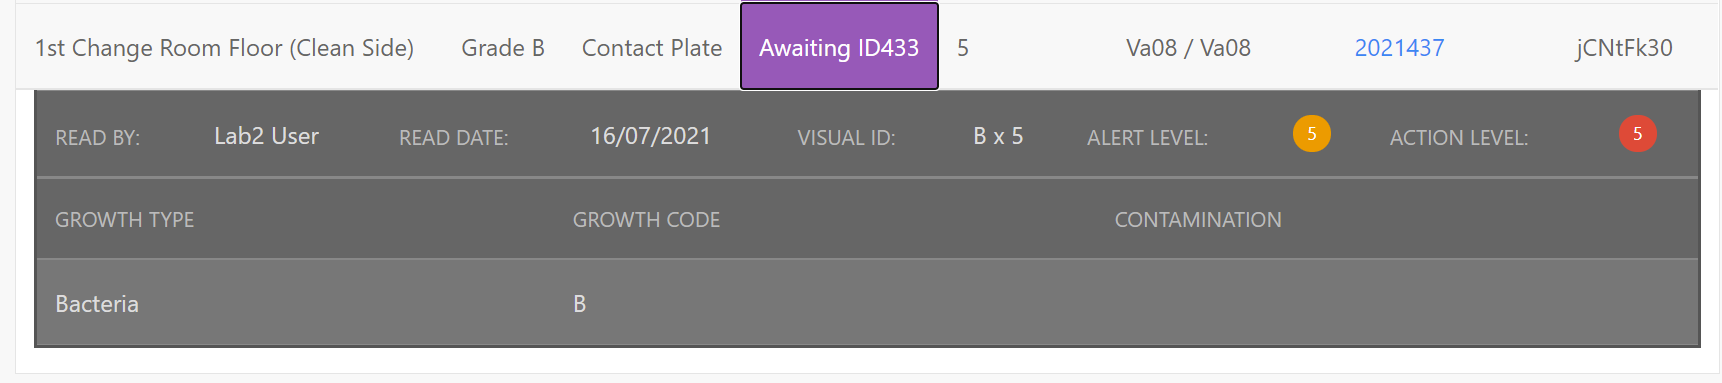
You can view further information on any Growths by clicking into the ID within the 'Growth' column:
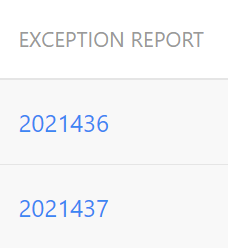
Similarly you can View the associated Exception Report, by clicking the Exception Report number against the relevant Result:
To go back to the Room's list of Results, click on the Back link in the top-left corner of the Result Set.
¶ Exception Reports
¶ View Exception Reports From a Room
From the Room Dashboard, select the Exceptions tab from the top menu, which will display a list of all Exception Reports generated from Plates within this Room.
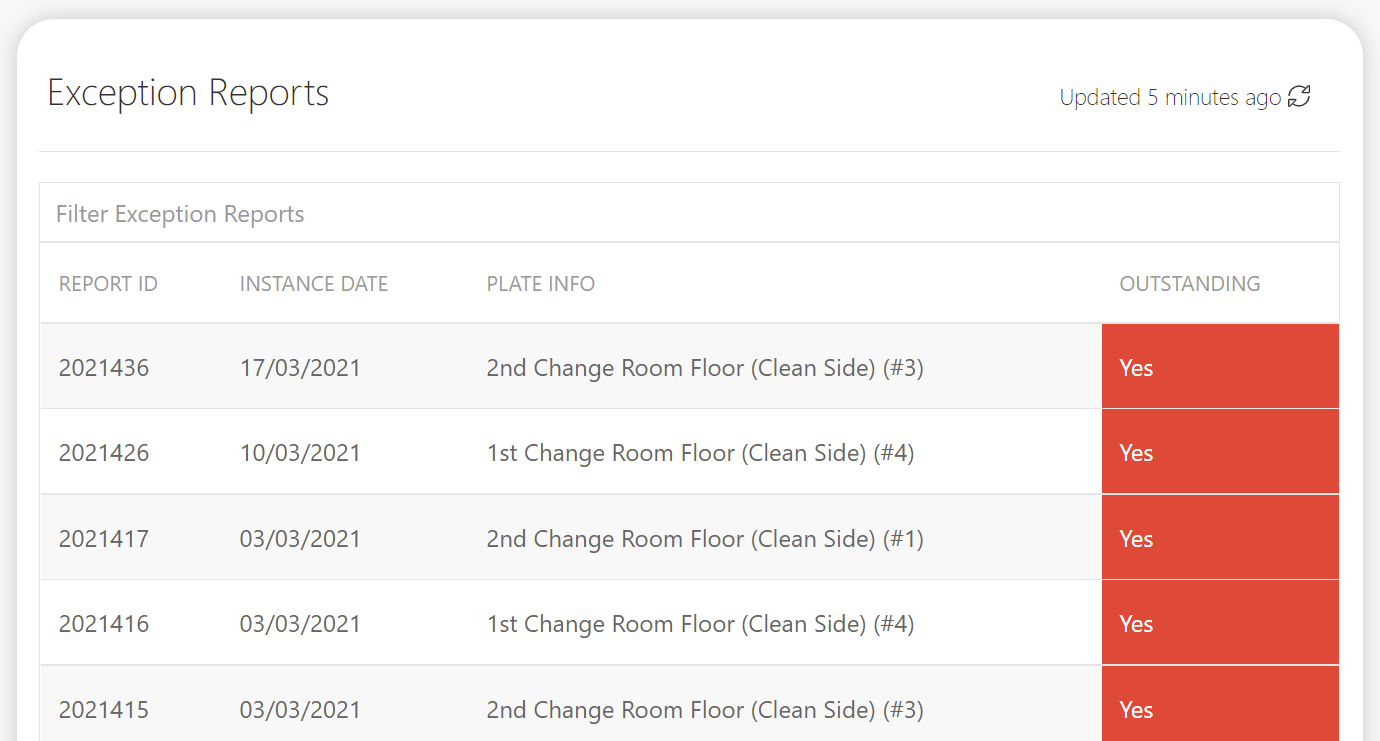
By default, Exceptions are ordered by the most recent Outstanding Reports.
To access the full details of an Exception Report, simply click its entry within the list.
¶ Closing an Exception Report
After clicking into an Exception Report from the list, You can review its details, view the associated result set by selecting the View Result Set button, or close it by clicking the Close Exception Report button.
Before you do this, you may want to enter a comment which will be relayed back to the QC Lab - this can be done from the Comments section of the Exception Report:
Simply enter your desired comment, and click the Post Comment button.
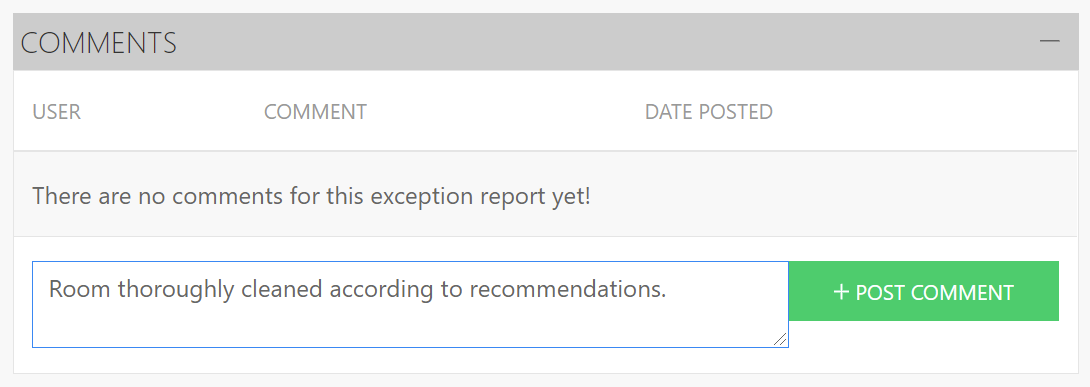
You cannot post a comment once an Exception Report has been closed.
¶ View Outstanding Identifications For a Room
From the initial Dashboard page within the Room you wish to view Outstanding Identifications for, select the Identifications tab from the top-menu and you should see Identifications that are still pending on the Lab-side:
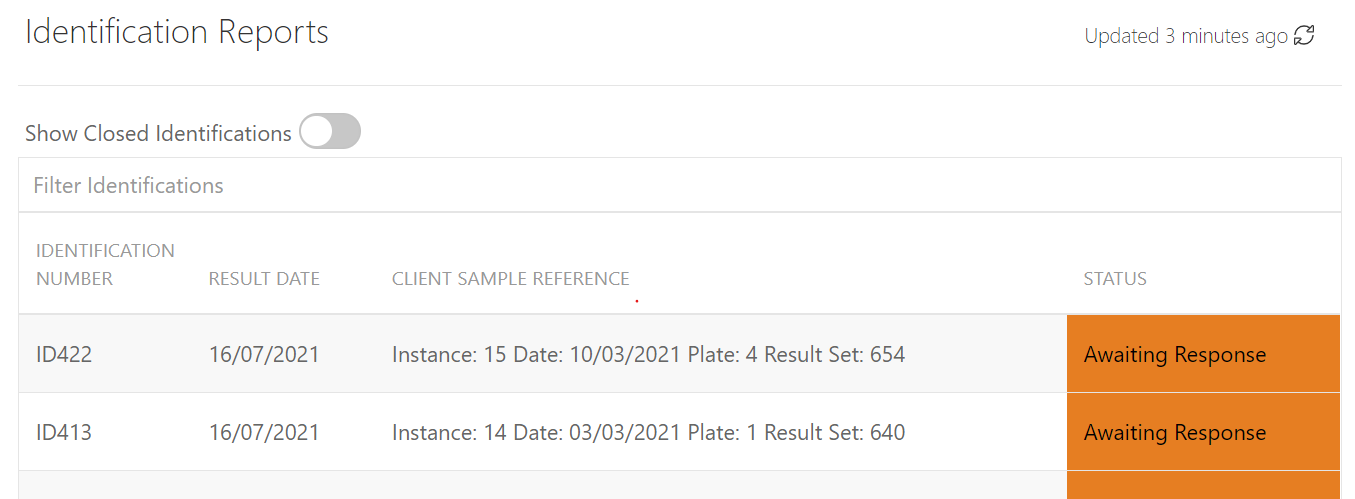
You can see the current status of each ID on the right-hand side, and simply click on the relevant ID row to access the full ID Report.
Closed Identifications can be displayed by clicking the Show Closed Identifications toggle.
Identifications can also be filtered based on Identification Number or Client Reference by typing into the Filter Identifications field above the list of IDs.
¶ View Booked-In Plates for the Current Room
You can check the status of any Book-Ins for the current Room by selecting the Booked In Plates tab from the top-menu and you should see all pending Book-Ins for this Room that have yet to be Read and Released by the Lab.
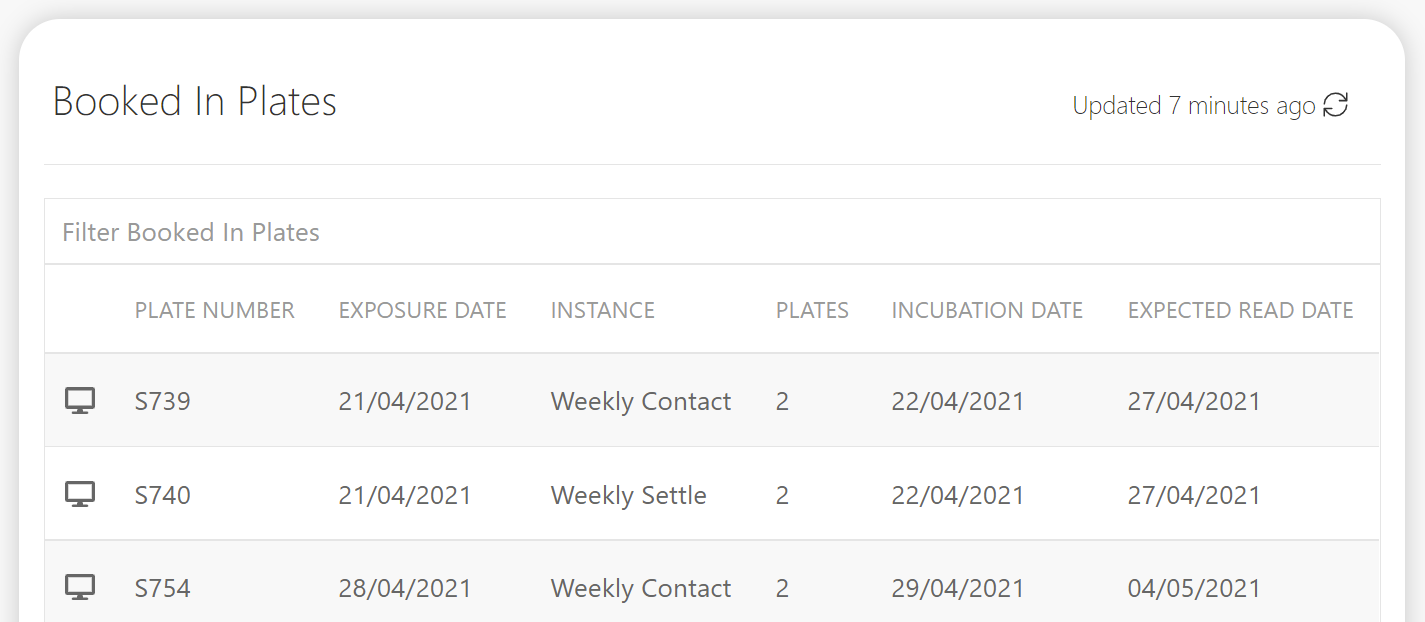
Book-Ins can be filtered based on Plate Number and Instance Name by typing into the Filter Booked-In Plates field above the list of Book-Ins.
Book-Ins submitted from the Web side are denoted with the icon, and Book-Ins submitted from the Lab side are denoted with the icon.
¶ Generate Reports For The Current Room
A variety of Reports can be generated and customised to display the data within an Individual Room.
This feature is accessed by selecting the Reports tab from the top-menu.

The Standard Reports are as follows:
- Monthly Report
View Results for each individual Plate within a Room for a given month. Filterable by Plate Group and Session. - Plate Failure Rates
View the Failure Rates of each plate over a specified range. - Operator/Server Failure Rates
View the Failure Rates of a given Operator/Server on a per-plate basis for the specified time period. - Growth Type Report
View a graphical representation of the various Growth Types encountered within this Room over the specified time period. - Exceptional Results
View and trend Exceptional Results from within this Room over the specified time period.
Reports are fully customisable for
To get more precisely detailed data from your Reports, we recommend setting up Plate Groups within your Rooms.
¶ Room Plate Group Manager
Room Plate Groups can be added which allow add any of the Room's Plates to your own custom groups which can then be reported on.
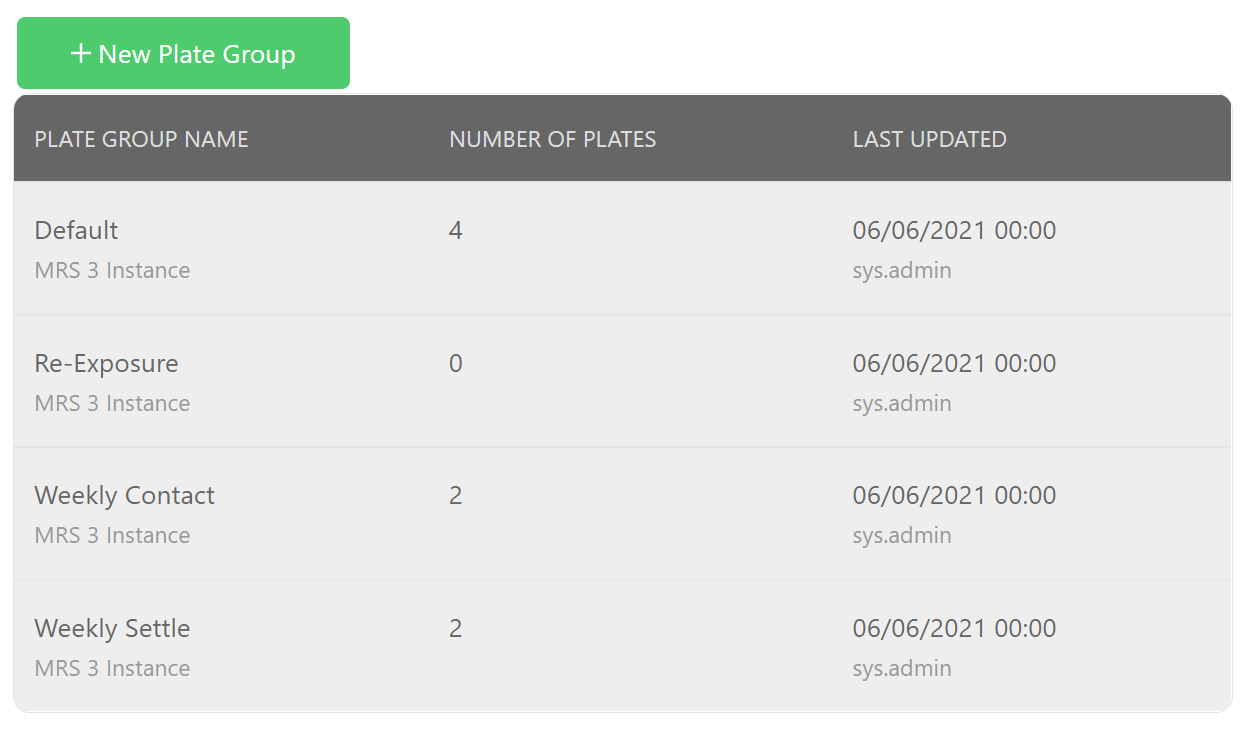
The Plate Group Manager can be accessed by clicking into a Room and selecting the Plate Groups tab from the top menu.
Your Room Instances will appear automatically within the Plate Groups section - these are represented by a slightly darker grey background, and the description 'MRS 3 Instance' and cannot be added or deleted here. They are shown for reference only.
¶ Adding a Plate Group to the Current Room
Only Users with Unit Admin priviliges for the Unit in which the Rooms sites, will be able to create Plate Groups for it.
Any Plate Groups created will be visible and reportable (but not editable) by regular Users who have access to the Room.
Plate Groups can be added from within the Plate Group Manager by clicking the New Plate Group button.
You will then be prompted to choose a name and description for your Group, and select the Plates that you would like to add to it.
Plates can be selected by ticking the checkbox to the left-hand side of the Plate Name:
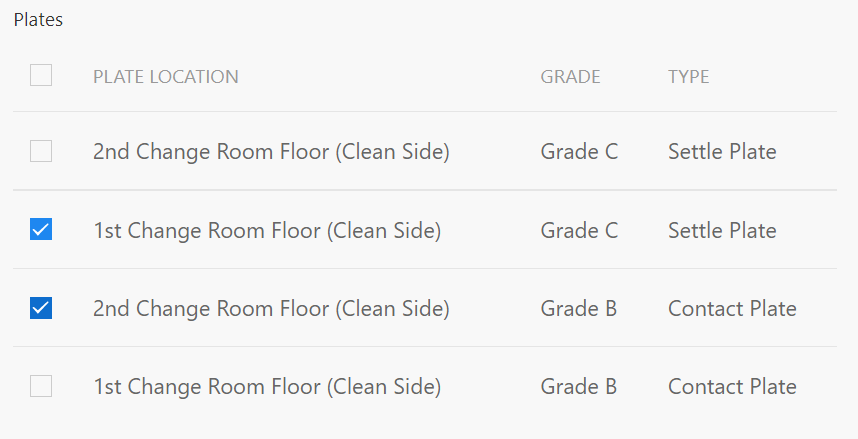
When you have finished setting up your Plate Group, click the Add button to complete the process of adding the Group.
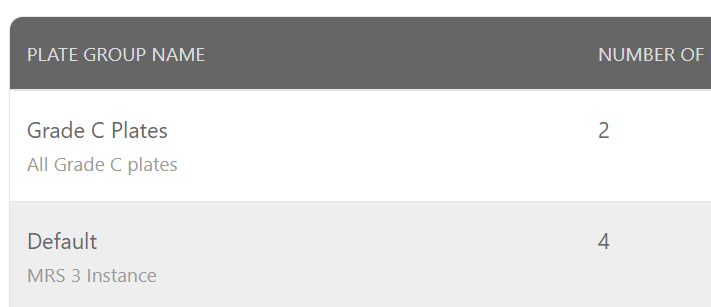
Your Group will then be visible within the Plate Group Manager, and you will display when running reports which can display 'Groups' data.
¶ Editing a Plate Group
Plate Groups can be edited from within the Plate Group Manager.
Simply click on the Plate Group that you wish to Edit:
Your Room Instances will appear automatically within the Plate Groups section - these are represented by a slightly darker grey background, and the description 'MRS 3 Instance' and cannot be added or deleted here. They are shown for reference only.
And you will be able to amend the Name, Description, and Plates that are part of the Group.
Once you have made your changes, click the Save button to Save your edits and complete the process.
¶ Deleting a Plate Group
Plate Groups can be deleted from within the Plate Group Manager.
Simply click on the Plate Group that you wish to Delete, and you will be taken to the Edit Plate Group screen.
From here, simply click the Delete Plate Group button on the bottom-right corner of the screen.
You will then be prompted to confirm the deletion by entering the Name of the Plate Group.
Finally, click the Delete <"PLATE GROUP NAME"> button to confirm the deletion and complete the process.
The deleted Plate Group will no longer appear within the Plate Group Manager.
¶ Room Forms
A Room Monitoring Form for the relevant Instance should be filled in and sent to the Lab alongside the Plates to be analysed.
These forms can be downloaded from within the Room Dashboard by clicking on the Room Forms tab from the top menu.
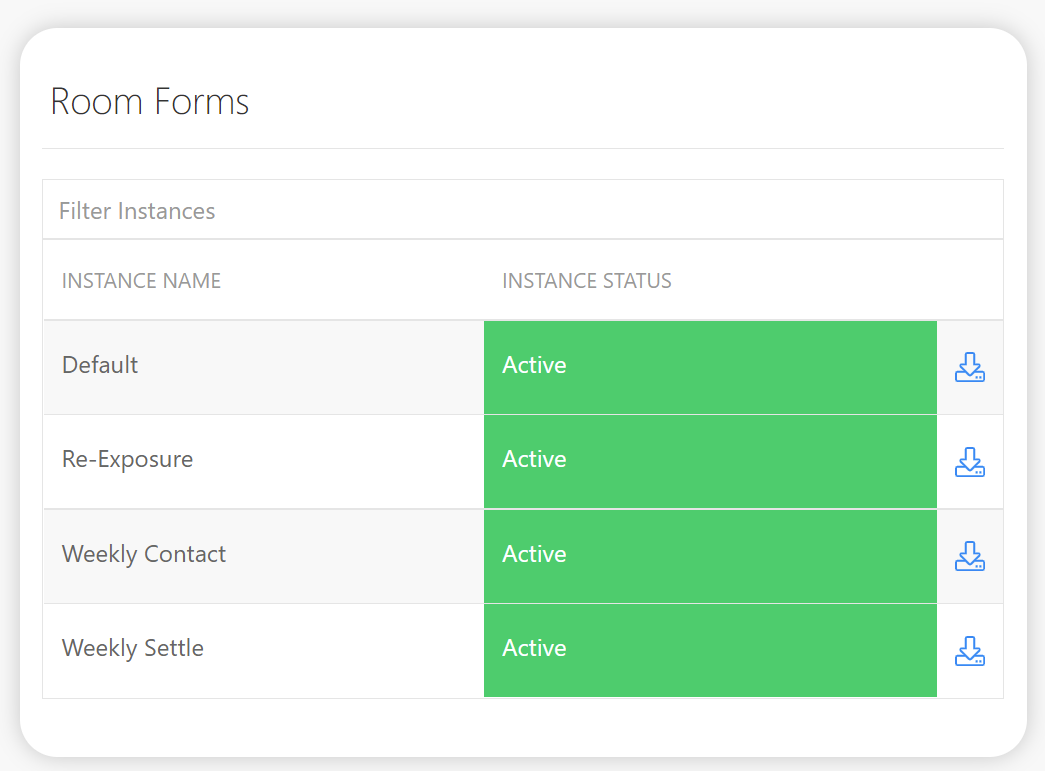
From here, simply click on the Download Icon against the relevant Room Form and your download will start.
Once downloaded it can then be printed, filled in, and sent along with the Plates.
It is strongly recommended that you always download the Room Forms from this section every time Plates are sent, as these forms are automatically kept in sync with the lab, and so will always be the most up-to-date version.
If you save a local copy and print that every time, you will not pick up any changes to the Room that may occur such as Plate Locations/Instances being added or removed from it.
¶ Room Users
Users can be added to a Room from the Room Users Dashboard section tab.
Once added, the Room will become visible on their main dashboard, and they will be able to access it and view the data within it. They will also appear within the list of Room Users displayed in this section of the Room Dashboard.
Adding a User to a Room will not allow them to Release and Manage Exception/Identification Reports, unless their user profile has been assigned Exception Report Administrator privileges.

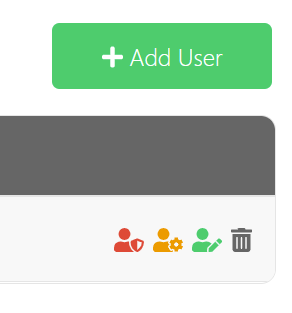
Each Room User's privileges are represented by the following icons which are displayed alongside their User entry:
- User is a System Administrator
- User is a Unit-Level Administrator
- User is an Exception Report Administrator and can respond to/release Exception and Identification Reports within this Room.
¶ Adding a User to a Room
To add a new User to the currently selected Room, select the Room Users Dashboard section tab and the click on the Add User button, on the right-hand side above the list of current Users:
This will display a dialog box in which you can either add an Existing User or Create a New User.
By default, you will be shown the option to add an existing User to the Room.
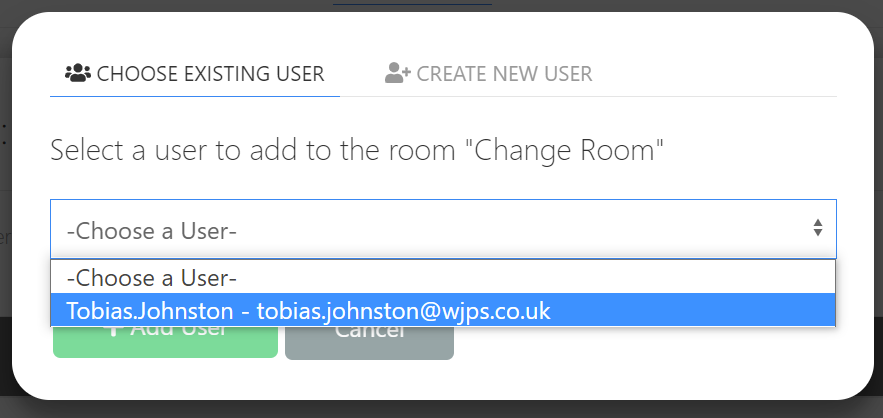
Simply select them from the Dropdown menu and then click the Add User button.
You should receive a brief notification confirming their addition to the Room, and they will now be present in the list of Room Users.
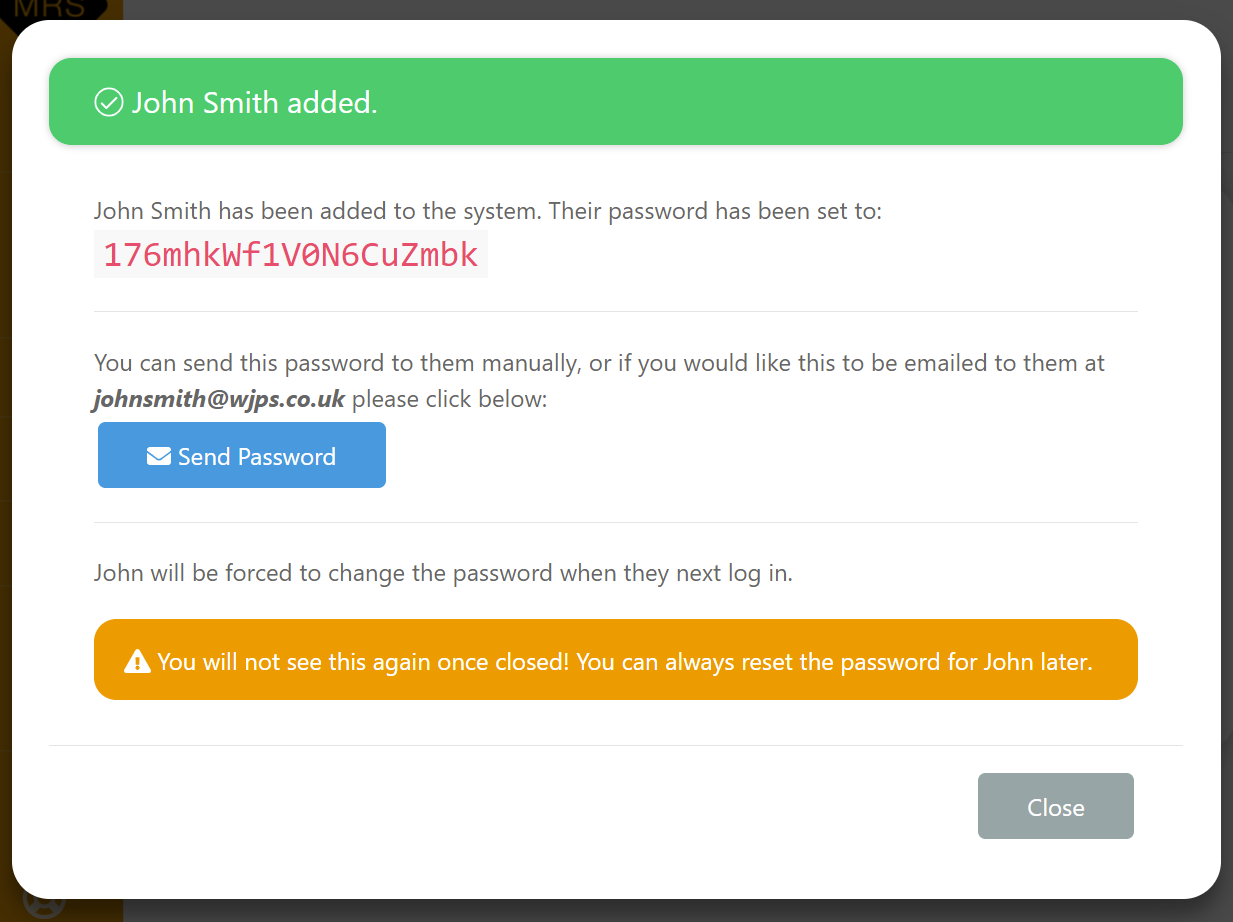
From the Add User dialog, select the Create New User tab.

You will then be able to create a new MRS Web User that will immediately have access to this Room.
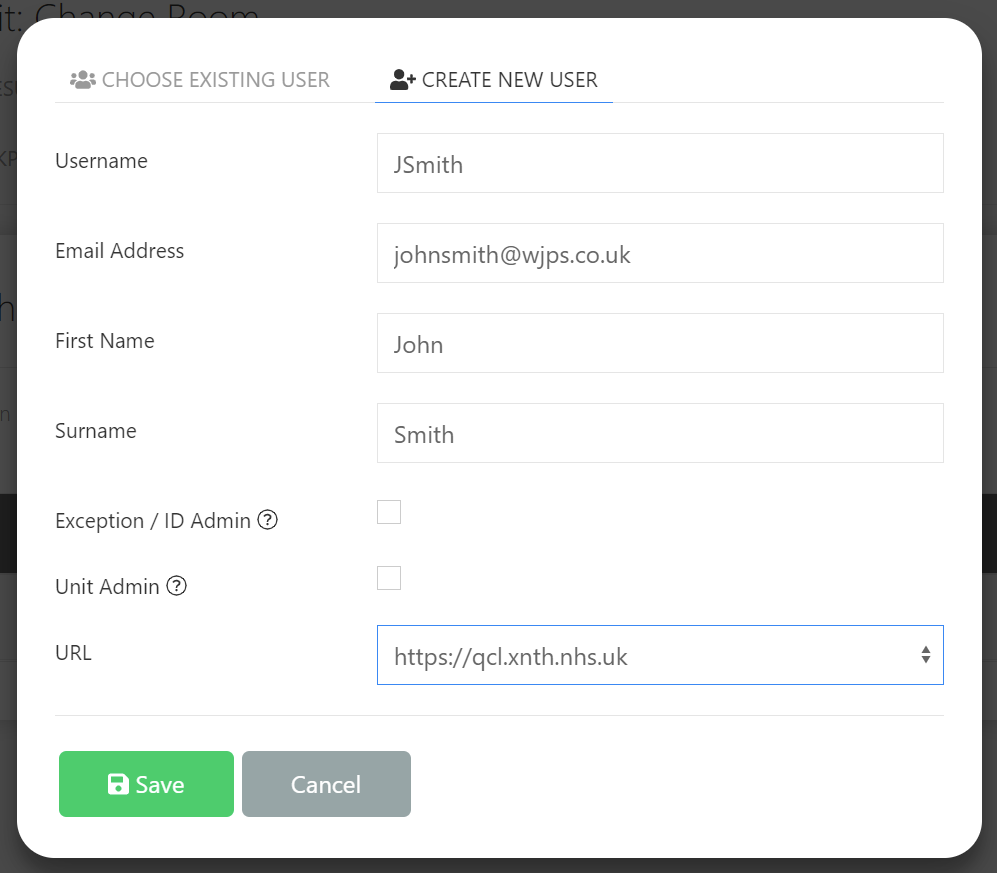
Enter the details for the New User and click Save
You should then receive a brief notification confirming that the User has been created and added to the Room, and you will then be shown their temporary password details, which you can then send to them to enable them to log in to MRS Web:
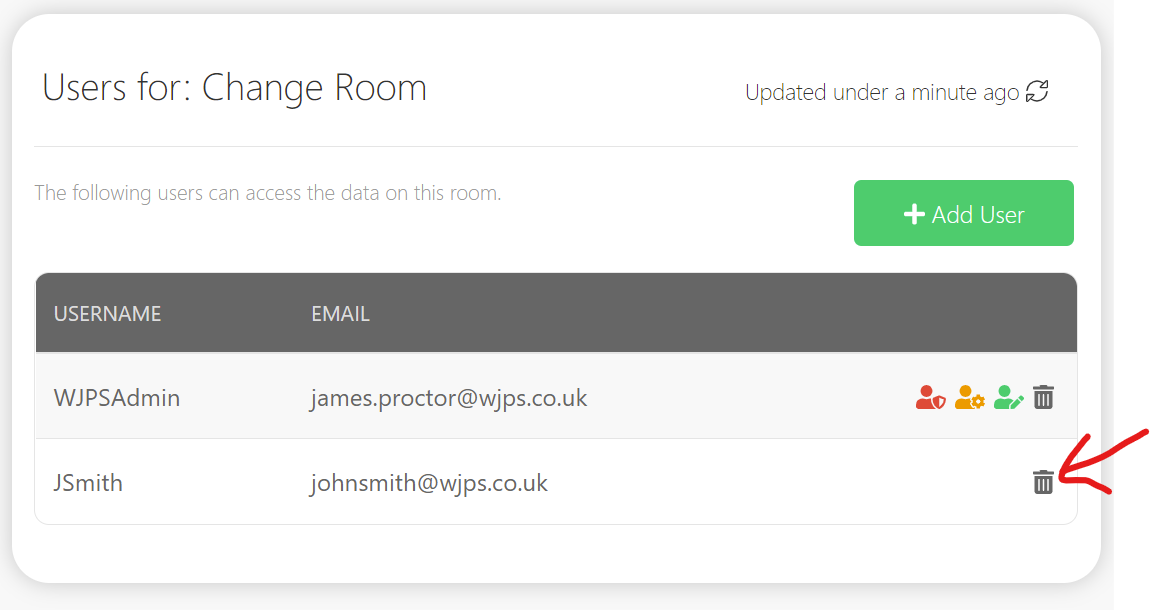
¶ Deleting a User from a Room
Users can easily be removed from a Room within the Room Users section, by finding their User entry, and clicking the Delete Icon :
You will then be asked to confirm the removal of the user from the Room.
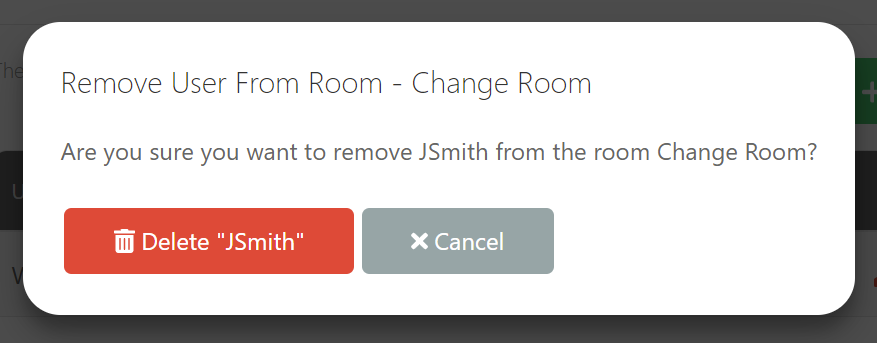
To confirm, click the Delete {Username} button and they will be removed from the Room.
Note that the delete action outlined above will only remove the User from the Room itself and not delete their MRS Web Account - that can only be done from within the User Management section.