The Settings section allows you to configure the various aspects of MRS to suit your organisation, configure User Accounts, and amend your own Account Information.
Your Account Access Level, determined by your System Administrator will affect the options available to you in this section.
¶ User Details
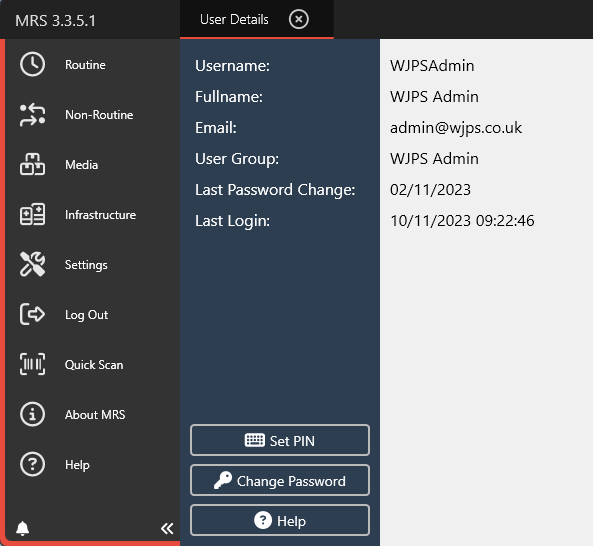
The User Details section of MRS will display information about your MRS User Account and allow you to change your PIN and Password.
¶ Set PIN
From the main User Details section, select Set PIN Number
Enter your current Password, and enter your desired PIN.
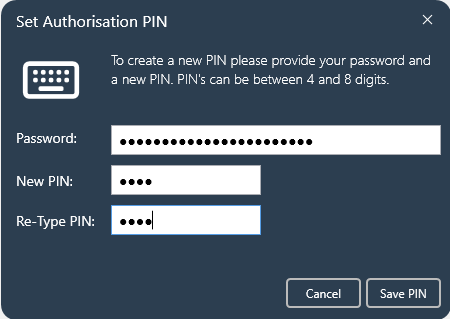
Select Save PIN to complete the process.
¶ Change Password
If your organisation is using MRS with Active Directory, you will not be able to use this feature, and instead, you must reset your password for your internal network.
Speak to your IT department if you are unsure on how to do this.
From the main User Details section, select Change Password
Enter your current Password, and enter your new desired Password.
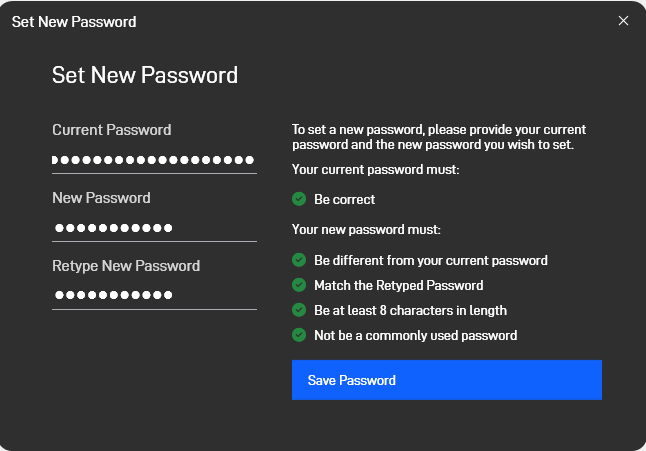
Select Save Password to complete the process.
¶ User Management
¶ User Interface Overview
¶ Adding a New User
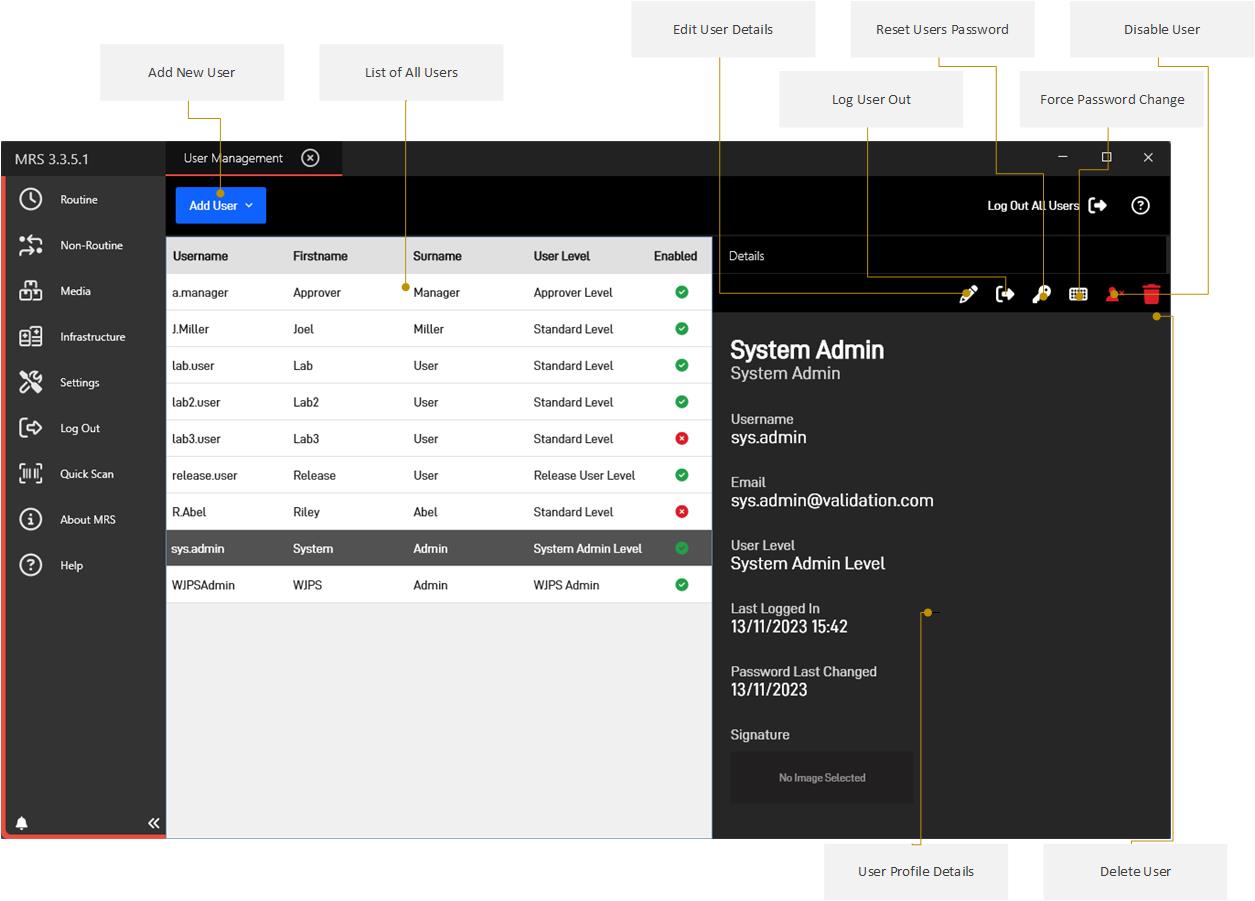
From within the main User Management Section, click on the button beneath the list of Users.
The User details pane on the right-hand side will go blank and you can input the User’s details:
- Username - Enter the desired username.
If Using Active Directory, click to search for a User to add. - Firstname - Enter the User’s First Name
- Surname - Enter the User’s Surname
- Email - Enter the User’s email address
- Job Title - Enter the User’s Job Title
- User Group - The Group to which this User belongs - This will affect what sections have access to within MRS and what actions they are allowed to take
- Signature - Upload a jpeg file containing their signature. This will display on Exception Reports they release.
Once all details have been entered, click Create to complete the process.
¶ Resetting a User’s Password
From within the main User Management Section, select the User whose password you wish to change and their details will appear in the right-hand pane.
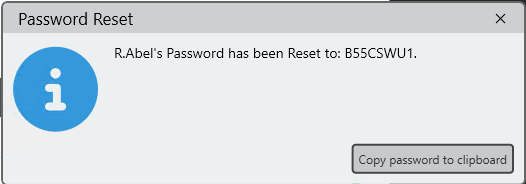
Click the Key icon above their details and their password will reset.
You will receive a notification informing you of their new password, and it will automatically be copied to your clipboard, so that you can easily send it to them.
¶ Logging a User Out
On occasion you may need to manually log out a User who is having trouble accessing the system.
Use the below method if they receive an error such as ‘User already logged in’ when they try to log in.
From within the main User Management Section, select the User whom you wish to log out, and then click the Log Out button above their details:
You should receive a notification that the User has been successfully logged out:

¶ Logging All Users Out
This function can be useful if you need to ensure all Users are logged out if upgrades or maintenance are to be performed.
From within the main User Management Section, select the ‘Log All Users Out’ button from below the list of Users:

You should receive a notification that all Users have been successfully logged out:

¶ Force a User to Change Their Password
You can force a User to change their Password when they next log onto MRS:
From within the main User Management Section, select the User to force a Password change on, annd select the ‘Force Password Change’ button
You should receive a notification that the User will be forced to change their Password upon their next login:

¶ Enabling/Disabling a User
You can manually enable or disable a User’s account without deleting it.
From within the main User Management Section, select the User you wish to enabled/disable from the list of Users.
Their details should appear in the right-hand pane.
Above their User Details, select the Enable/Disable User button and it will change colour to reflect the status of the User:
- indicates that the User is Activated and can log into their account.
- indicates that the User is Deactivated, and cannot log into their account.
¶ User Group Management
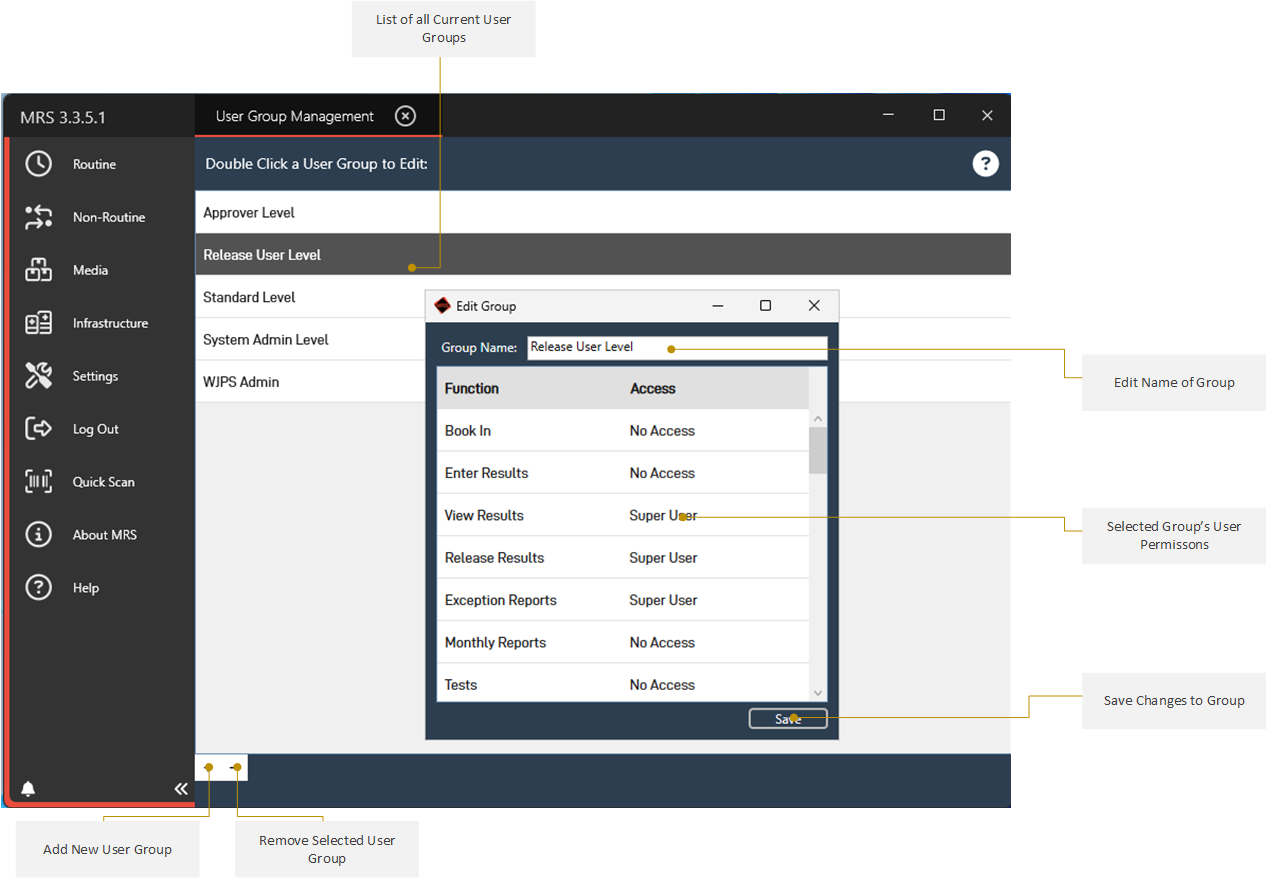
User Groups determine the level of access to MRS that Users within that Group have.
At the most basic level, you would have an Administrator, and Regular User Groups, and Administrators would have access to a whole array of settings and features that Users within the Regular Users group would be unable to use.
Within MRS, you have extensive control of these Groups, with the ability to create as many as you like, and have fine, granular control over what members of these Groups can do.
¶ User Interface Overview
¶ Adding a User Group
From within the main User Group Management Section, click the ‘Add User Group’ button below the list of current User Groups.
Enter a Name for your Group, and select the Level of Access for each function that Users within that Group should have.
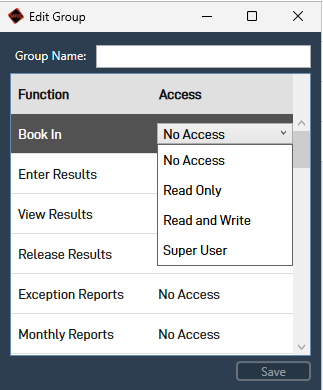
Access levels are:
- No Access
Users within this Group have no access at all to this section. - Read Only
Users within this Group can view this section, but are unable to add or edit anything in this section. - Read and Write
Users within this Group can View, Add, and Edit items in this section. - Super Users
Users within this Group will be prompted for a Super User to enter their PIN in order to access this section.
Once you have set your desired Access Levels, click Save and you should receive a Notification that the Group has been added successfully:

¶ Audit
All User actions are fully Audited within MRS - whenever an action is performed, it’s details are logged and can be viewed by Administrators at any time.
¶ User Interface Overview
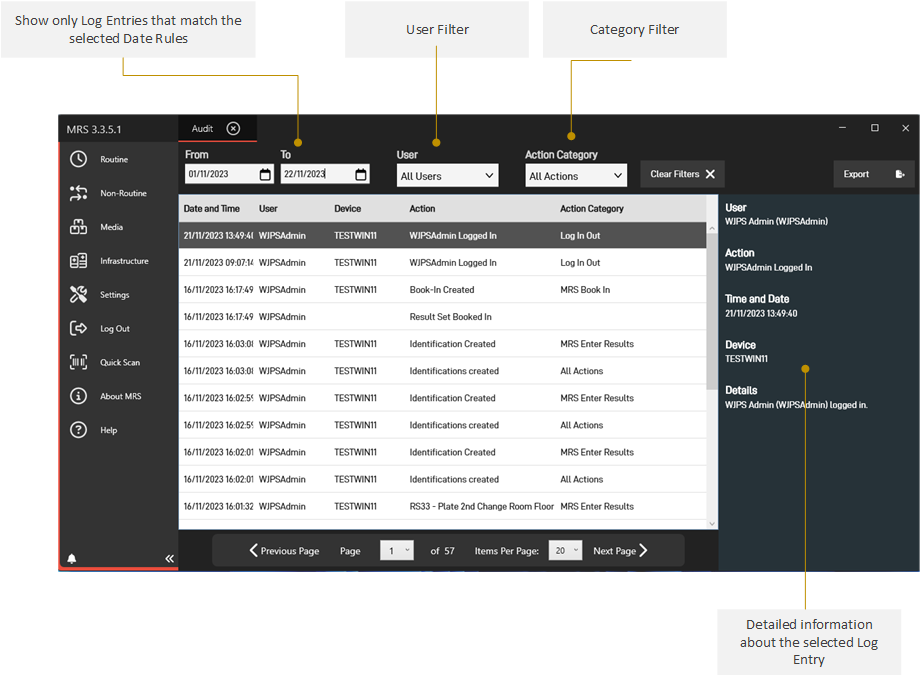
The following details are stored about each user action:
- Date and Time: The date and time the action was performed.
- User: The User who performed the action.
- Device: The registered device name from which the action was performed.
- Action: The Name of the type of action performed eg.
Exception Report Released - Action Category: The category under which this action falls and is recorded.
Select the action in the main screen to view more details on the right hand pane.
¶ Filtering Audit Entries
Audit entries can be filtered, to only show entries that match certain dates, user or category criteria.
From within the Main Audit Section, select dates in the From and To boxes.
Audit entries can also be filtered by User and Action Category.
The filters can be reset by clicking on the Clear Filters button
¶ View Emails
This section allows Administrators to view the status of any emails automatically generated and sent by MRS.
¶ User Interface Overview
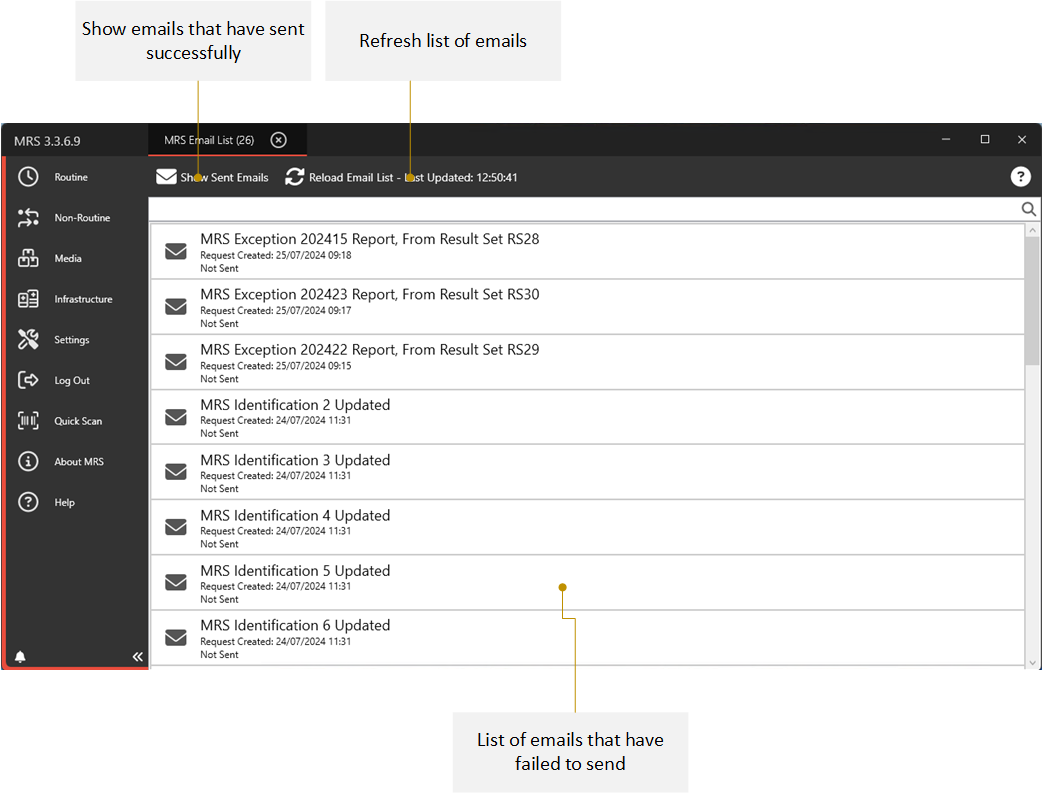
By default, the interface displays emails that have failed to send, though you can view successfully sent emails by selecting the Show Sent Emails button.
¶ Re-sending a Failed Email
You retry sending a failed email by selecting the email you wish to re-send from the list and clicking Re-Send Selected Email from the menu above.
If the request fails again, you should see details as to why.
If you are unsure on how to rectify this, please raise a support ticket with WJP Software.